RHEL 10 Subscription Registration
After installing RHEL 10.1, don’t rush to run commands or install software. Since RHEL uses a subscription model, software installation and system updates depend on the official repositories, and dnf typically cannot retrieve packages without an active subscription. Therefore, the first thing to do after logging in is to activate your subscription and perform the initial system update.
Log into the system, press the Win key or click the Red Hat logo in the upper-left corner to launch the terminal.
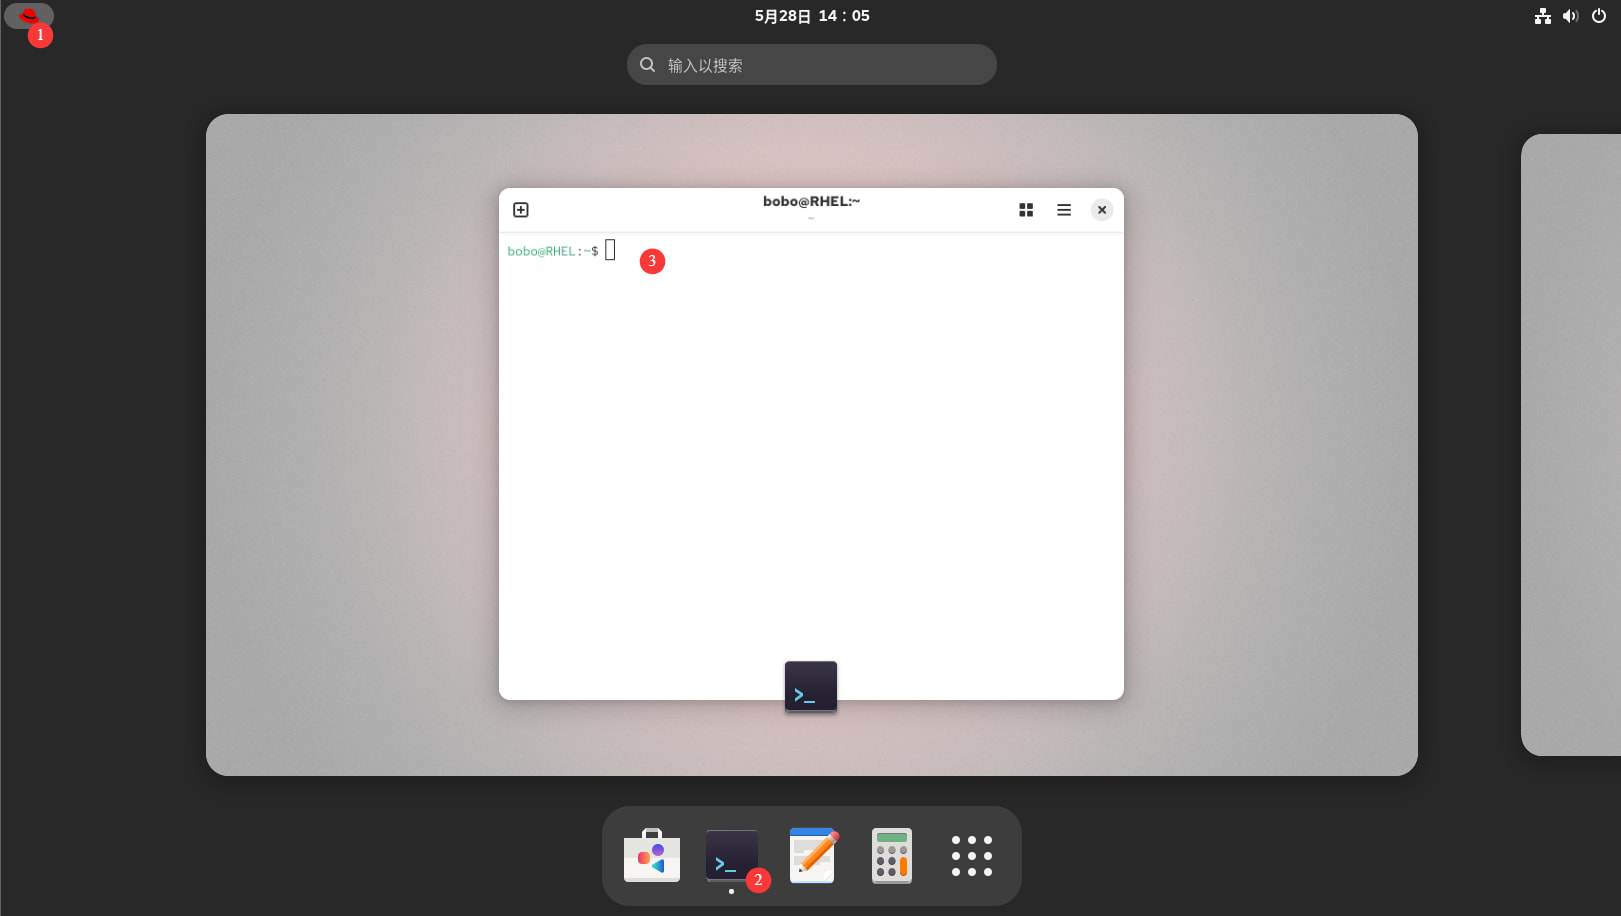
Note: Both subscription registration and system updates require
rootprivileges. If you are logged in as a regular user, switch torootfirst, or prefix commands withsudo.
In RHEL 10, the
subscription-managerhas completely removed theattachmodule and its associated parameters. No attachment (attach) operation is needed.
su - # Switch to root user; after entering the root password, the prompt changes to # indicating you are in the admin environment
Run the following command in the console to register the system using your Red Hat developer account:
subscription-manager register --username <Red Hat account> --password <password>
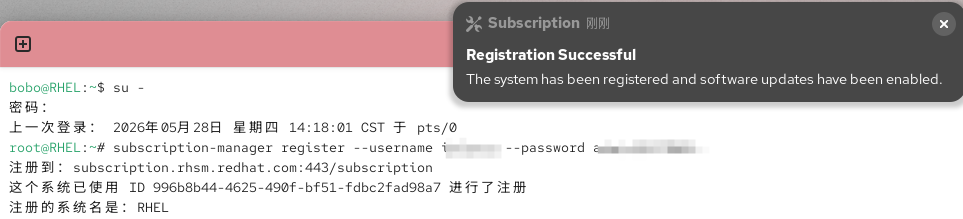
After registration, develop the habit of checking the subscription status to confirm it is active:
subscription-manager status
Once the status shows Registered, you can proceed with the first system update to ensure base components are at the latest level:
dnf update -y

RHEL 10 Network Configuration
There are three main ways to configure the network. The simplest is through the desktop settings, but in server environments, everything is managed via the command line. Here we cover the relatively complex command-line approaches using the nmcli command and configuration files.
Starting with RHEL 8, the system uses NetworkManager to centrally manage the network. By RHEL 10, the traditional ifcfg-* method has been deprecated.
In RHEL 10, the default network configuration files are stored in
/etc/NetworkManager/system-connections/, and the file format has changed to INI-style.nmconnection. Understanding this underlying mechanism change allows us to configure the network in two ways: using thenmcliinteractive command-line tool, or by directly modifying the underlying configuration files.
Configuring the Network with nmcli
Before you begin, it’s important to understand two core concepts, or you may easily make mistakes with the parameters:
- Device: Refers to the physical network interface itself, such as
ens160. - Connection: Refers to the configuration profile applied to that network interface, which includes IP, gateway, and other information.
Often, the connection name and device name are the same, such asens160, but when modifying the network, you are essentially modifying the connection.
Viewing Network Status
First, check the current IP status of the system’s network interfaces:
root@RHEL:~# ifconfig
ens160: flags=4163<UP,BROADCAST,RUNNING,MULTICAST>  mtu 1500
        inet 172.16.0.10  netmask 255.255.255.0  broadcast 172.16.0.255
        inet6 fe80::20c:29ff:fe66:7d6d  prefixlen 64  scopeid 0x20<link>
        ether 00:0c:29:66:7d:6d  txqueuelen 1000  (Ethernet)
        RX packets 963804  bytes 1447901368 (1.3 GiB)
        RX errors 0  dropped 0  overruns 0  frame 0
        TX packets 91978  bytes 5447691 (5.1 MiB)
        TX errors 0  dropped 0 overruns 0  carrier 0  collisions 0

lo: flags=73<UP,LOOPBACK,RUNNING>  mtu 65536
        ...
You can see the current system has two network interfaces: one is the “physical NIC” ens160 added to the VM, and the other is the loopback virtual interface lo (used for local internal communication, which you typically don’t need to worry about).
- ens160: The network interface name. In general, physical NICs used for production traffic are prefixed with
ensorenp. - UP, RUNNING: Indicates the interface is currently enabled and actively operating.
- inet 172.16.0.10: The currently assigned IPv4 address, with
netmask255.255.255.0, prefix/24. - inet6 … scopeid 0x20: This is the IPv6 link-local address, typically starting with
fe80::. - ether 00:0c:29:66:7d:6d: The physical MAC address of the NIC.
- RX/TX packets: Represents the number and volume of packets received (RX) and transmitted (TX) by the interface. This can be used to quickly determine whether the NIC is actively processing data.
After confirming the current IP, check the hardware status of the physical NIC in NetworkManager
(The # indicates the command being executed)
Focus mainly on the DEVICE (NIC name) and CONNECTION (currently active connection name) columns. Only when the NIC STATE shows connected does it mean a connection profile is bound to it.
root@RHEL:~# nmcli device status
DEVICE  TYPE      STATE         CONNECTION
ens160  ethernet  connected     ens160
lo      loopback  connected (external)  lo
Next, view the existing connection configurations. The current NIC and connection name are both ens160.
The list below shows the configuration profiles stored on the system. Confirm the NAME column here, as all subsequent modification commands must target this NAME.
root@RHEL:~# nmcli connection show
NAME    UUID                                  TYPE      DEVICE
ens160  a20596a9-215f-3835-8189-200e617603f9  ethernet  ens160
lo      1cb84265-5457-443b-9d2f-692a2442c7ab  loopback  lo
To view more detailed output, append the specific connection name, and use the keyboard shortcut CTRL+C to exit view mode after execution. This shortcut interrupts the currently running command. From the output, you can find that the current address configuration method is manual (static mode).
root@RHEL:~# nmcli connection show ens160
connection.id:                          ens160
connection.uuid:                        a20596a9-215f-3835-8189-200e617603f9
connection.stable-id:                   --
connection.type:                        802-3-ethernet
connection.interface-name:              ens160
...
ipv4.method:                            manual   # Static mode
ipv4.dns:                               172.16.0.2, 223.5.5.5      # Primary and secondary DNS addresses
ipv4.dns-search:                        --
ipv4.dns-options:                       --
ipv4.dns-priority:                      0
ipv4.addresses:                         172.16.0.10/24          # IPv4 address
ipv4.gateway:                           172.16.0.2                   # Gateway address
...
GENERAL.MASTER-PATH:                    --
IP4.ADDRESS[1]:                         172.16.0.10/24
IP4.GATEWAY:                            172.16.0.2
IP4.ROUTE[1]:                           dst = 0.0.0.0/0, nh = 172.16.0.2, mt = 100
IP4.ROUTE[2]:                           dst = 172.16.0.0/24, nh = 0.0.0.0, mt = 100
IP4.DNS[1]:                             172.16.0.2
IP4.DNS[2]:                             223.5.5.5
IP6.ADDRESS[1]:                         fe80::20c:29ff:fe66:7d6d/64
IP6.GATEWAY:                            --
IP6.ROUTE[1]:                           dst = fe80::/64, nh = ::, mt = 1024
Configuring DHCP
The current NIC uses a static IP. First, let’s change it to DHCP by modifying the IPv4 acquisition method to auto and clearing the manually configured IPv4 information.
nmcli connection modify ens160 ipv4.method auto
modify ens160: Specifies the connection profile namedens160for modification.ipv4.method auto: Sets the acquisition method to automatic. When set to automatic, the system will request IP, gateway, and DNS from the DHCP server.
However, if you previously configured a static IP as I did, using only the command below will clear the old configuration; otherwise, logical errors may occur and DHCP will not take effect.
nmcli connection modify ens160 ipv4.method auto ipv4.addresses "" ipv4.gateway "" ipv4.dns ""
After modification, the configuration is not immediately applied to the NIC. You must execute the following command to restart the connection and activate it immediately:
nmcli connection up ens160
Once effective, verify whether the NIC successfully obtained a dynamic IP with the following command:
ip addr show ens160
Look for the line containing inet in the output; the DHCP server-assigned IP address and subnet mask will follow. From the output below, you can see mine is 172.16.0.128/24, previously 172.16.0.10/24. If this line exists and the address is normal, DHCP configuration is successful.
root@RHEL:~# nmcli connection modify ens160 ipv4.method auto ipv4.addresses "" ipv4.gateway "" ipv4.dns ""
root@RHEL:~# nmcli connection up ens160
Connection successfully activated (D-Bus active path: /org/freedesktop/NetworkManager/ActiveConnection/9)
root@RHEL:~# ip addr show ens160
2: ens160: <BROADCAST,MULTICAST,UP,LOWER_UP> mtu 1500 qdisc mq state UP group default qlen 1000
    link/ether 00:0c:29:66:7d:6d brd ff:ff:ff:ff:ff:ff
    altname enp3s0
    altname enx000c29667d6d
    inet 172.16.0.128/24 brd 172.16.0.255 scope global dynamic noprefixroute ens160
       valid_lft 1793sec preferred_lft 1793sec
    inet6 fe80::20c:29ff:fe66:7d6d/64 scope link noprefixroute
       valid_lft forever preferred_lft forever
Configuring a Static IPv4 Address
Most production environment servers use a fixed IP.
Using my VMware NAT network as an example, the subnet is 172.16.0.0/24 and the gateway is 172.16.0.2.
Before starting configuration, you need to check your own VMware virtual NIC’s subnet information. Do not simply copy and paste commands, so that you can access the network normally via NAT.
Previously, we changed the NIC to automatically obtain an IP via DHCP. Now, switch it back to static configuration.
Set the NIC address to 172.16.0.10/24, default gateway 172.16.0.2, and DNS 172.16.0.2, 223.5.5.5.
You can modify all properties with a single command:
nmcli connection modify ens160 ipv4.method manual ipv4.addresses 172.16.0.10/24 ipv4.gateway 172.16.0.2 ipv4.dns 172.16.0.2,223.5.5.5
ipv4.method manual: Changes the mode tomanual(static). You must specify method first, otherwise the static address will not take effect.ipv4.addresses .../24: Sets the IP address and subnet mask length.ipv4.gateway: Default gateway.ipv4.dns: Configures DNS. Without it, you can only ping IP addresses and cannot resolve domain names.
After completing the configuration, restart the connection to apply it. Once effective, check the IP and routing:
nmcli connection up ens160
ip addr show ens160
ip route                                    # View current routing information
root@RHEL:~# nmcli connection modify ens160 ipv4.method manual ipv4.addresses 172.16.0.10/24 ipv4.gateway 172.16.0.2 ipv4.dns 172.16.0.2,223.5.5.5
root@RHEL:~# nmcli connection
add      delete   edit     help     load     modify   reload   up
clone    down     export   import   migrate  monitor  show
root@RHEL:~# nmcli connection up ens160
Connection successfully activated (D-Bus active path: /org/freedesktop/NetworkManager/ActiveConnection/10)
root@RHEL:~# ip addr show ens160
2: ens160: <BROADCAST,MULTICAST,UP,LOWER_UP> mtu 1500 qdisc mq state UP group default qlen 1000
    link/ether 00:0c:29:66:7d:6d brd ff:ff:ff:ff:ff:ff
    altname enp3s0
    altname enx000c29667d6d
    inet 172.16.0.10/24 brd 172.16.0.255 scope global noprefixroute ens160
       valid_lft forever preferred_lft forever
    inet6 fe80::20c:29ff:fe66:7d6d/64 scope link noprefixroute
       valid_lft forever preferred_lft forever
root@RHEL:~# ip route
default via 172.16.0.2 dev ens160 proto static metric 100
172.16.0.0/24 dev ens160 proto kernel scope link src 172.16.0.10 metric 100
- Check whether the
inetfield shows the static IP you just configured. - When reviewing the route, look for a line starting with
default via 172.16.0.2.defaultindicates the default route, meaning all traffic to external networks is forwarded through this gateway.
Configuring IPv6
In an IPv6 environment, the operational logic is the same as IPv4, only the commands differ slightly. For example, to configure a static v6 address and gateway (address shown is for illustration):
nmcli connection modify ens160 ipv6.method manual ipv6.addresses 2001:8888:1::10/64 ipv6.gateway 2001:8888:1::1 ipv6.dns 2402:4e00::
Again, execute the command to activate the configuration. Once effective, check the v6 address and routing:
nmcli connection up ens160
ip -6 addr show ens160
ip -6 route
root@RHEL:~# nmcli connection modify ens160 ipv6.method manual ipv6.addresses 2001:8888:1::10/64 ipv6.gateway 2001:8888:1::1  ipv6.dns 2402:4e00::
root@RHEL:~# nmcli connection up ens160
Connection successfully activated (D-Bus active path: /org/freedesktop/NetworkManager/ActiveConnection/11)
root@RHEL:~# ip -6 addr show ens160
2: ens160: <BROADCAST,MULTICAST,UP,LOWER_UP> mtu 1500 qdisc mq state UP group default qlen 1000
    altname enp3s0
    altname enx000c29667d6d
    inet6 2001:8888:1::10/64 scope global noprefixroute
       valid_lft forever preferred_lft forever
    inet6 fe80::20c:29ff:fe66:7d6d/64 scope link noprefixroute
       valid_lft forever preferred_lft forever
root@RHEL:~# ip -6 route
2001:8888:1::/64 dev ens160 proto kernel metric 100 pref medium
fe80::/64 dev ens160 proto kernel metric 1024 pref medium
default via 2001:8888:1::1 dev ens160 proto static metric 100 pref medium
Configuring the Network via Configuration Files
In addition to using the nmcli command, directly modifying configuration files is also an approach, especially when performing automated deployments.
As mentioned earlier, RHEL 10 network configuration files are stored in /etc/NetworkManager/system-connections/. We can directly edit the corresponding NIC configuration file with vim:
vim /etc/NetworkManager/system-connections/ens160.nmconnection
Basic vim editing guide:
- After opening the file, press the
ikey on the keyboard. When-- INSERT --appears at the bottom, you have entered insert mode and can modify text.- After making changes, press
Escto exit insert mode.- Type
:wqand press Enter to save the file and exit. If you made a mistake and want to discard changes, type:q!to force quit.
Configuring DHCP
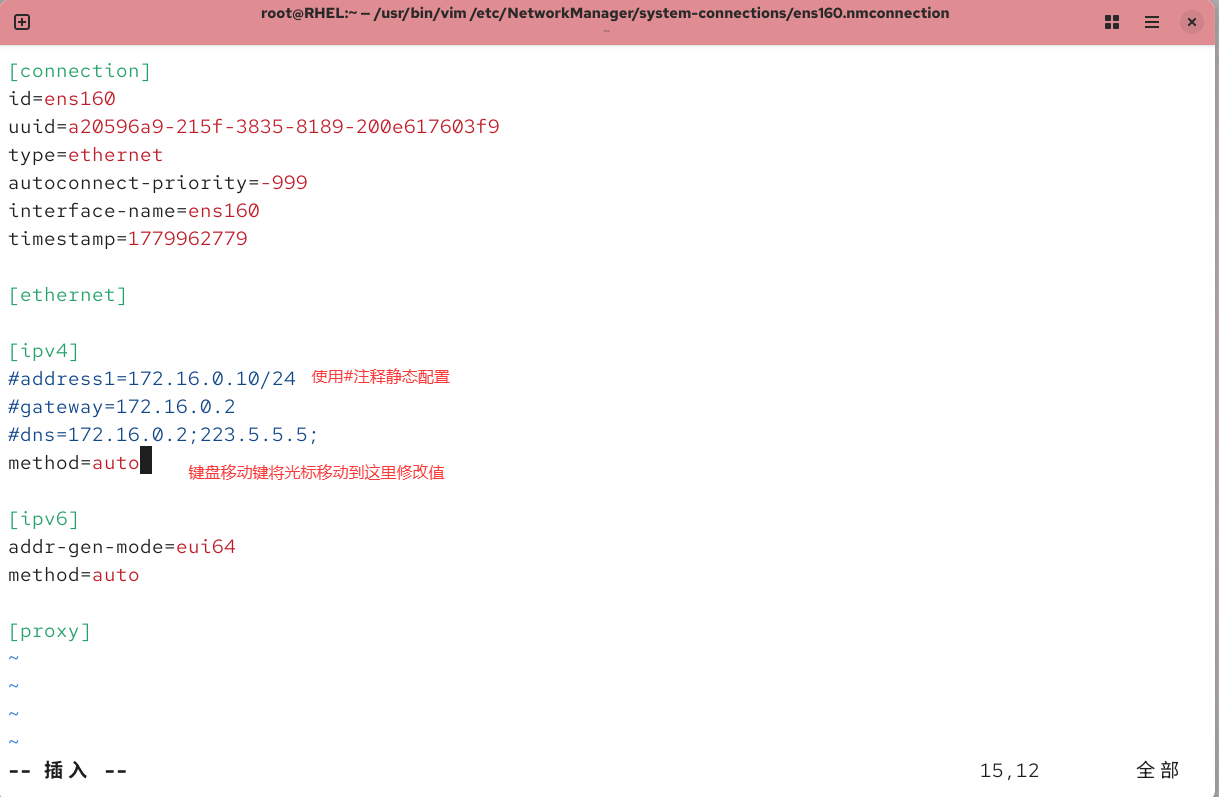
In the opened file, locate the [ipv4] section. For DHCP, only keep method=auto and delete/comment out all lines related to static addresses:
[ipv4]
method=auto
Configuring a Static IP
The [ipv4] section should be written as follows. To configure multiple IP addresses, simply increment the suffix of address numerically. Only specify one gateway:
[ipv4]
method=manual
address1=172.16.0.10/24,172.16.0.254
address2=172.16.0.20/24
dns=223.5.5.5;
INI Syntax:
- Unlike the old
ifcfgformat, the Keyfile format combines IP, subnet mask, and gateway into one entry. The format afteraddress1=isIP_address/subnet_prefix,gateway_address, separated by a comma. The gateway can also be written on a separate line. - After
dns=, enter the DNS server address. If there are multiple, separate them with semicolons, and the entire line must end with a semicolon;. - To configure IPv6, add the corresponding
address1andmethod=manualunder the[ipv6]section in the file. The syntax rules are the same.
Reloading and Activating
After editing the text and saving, the NetworkManager daemon does not know by default that the file has been modified.
Execute the reload command first to have the service re-read the files on disk, then bring up the connection. Otherwise, your changes will not take effect:
nmcli connection reload
nmcli connection up ens160
root@RHEL:~# vi /etc/NetworkManager/system-connections/ens160.nmconnection
root@RHEL:~# nmcli connection reload
root@RHEL:~# nmcli connection up ens160
Connection successfully activated (D-Bus active path: /org/freedesktop/NetworkManager/ActiveConnection/16)
root@RHEL:~# ip addr show ens160
2: ens160: <BROADCAST,MULTICAST,UP,LOWER_UP> mtu 1500 qdisc mq state UP group default qlen 1000
    link/ether 00:0c:29:66:7d:6d brd ff:ff:ff:ff:ff:ff
    altname enp3s0
    altname enx000c29667d6d
    inet 172.16.0.128/24 brd 172.16.0.255 scope global dynamic noprefixroute ens160
       valid_lft 1792sec preferred_lft 1792sec
    inet6 fe80::20c:29ff:fe66:7d6d/64 scope link noprefixroute
       valid_lft forever preferred_lft forever
Network Connectivity Test
After network configuration is complete, use the ping command to verify network connectivity.
Unlike Windows, running ping directly on Linux will continuously send probe packets until you press Ctrl + C to interrupt. To avoid constant output flooding the screen, we typically include the -c parameter in practice to specify the exact number of packets to send. Be careful not to omit the space.
First, ping the gateway to verify that the physical link and internal network configuration are correct.
The output shows no timeouts, and response statistics are generated. Four packets were sent and all four were received, indicating the network is reachable.
root@RHEL:~# ping -c 4 172.16.0.2
PING 172.16.0.2 (172.16.0.2) 56(84) bytes of data.
64 bytes from 172.16.0.2: icmp_seq=1 ttl=128 time=0.194 ms
64 bytes from 172.16.0.2: icmp_seq=2 ttl=128 time=0.119 ms
64 bytes from 172.16.0.2: icmp_seq=3 ttl=128 time=0.226 ms
64 bytes from 172.16.0.2: icmp_seq=4 ttl=128 time=0.273 ms

--- 172.16.0.2 ping statistics ---
4 packets transmitted, 4 received, 0% packet loss, time 3062ms
rtt min/avg/max/mdev = 0.119/0.203/0.273/0.056 ms
Test domain name connectivity. Ping a domain name to check whether routing to external networks is functioning properly and whether the configured DNS is effective.
You can see that the domain name resolved to an IP address, and replies were received from the remote server.
root@RHEL:~# ping -c 4 www.sitetalk.net
PING www.sitetalk.net.a1.initxb.com (101.200.115.63) 56(84) bytes of data.
64 bytes from 101.200.115.63: icmp_seq=1 ttl=128 time=47.9 ms
64 bytes from 101.200.115.63: icmp_seq=2 ttl=128 time=62.0 ms
64 bytes from 101.200.115.63: icmp_seq=3 ttl=128 time=59.8 ms
64 bytes from 101.200.115.63: icmp_seq=4 ttl=128 time=51.9 ms

--- www.sitetalk.net.a1.initxb.com ping statistics ---
4 packets transmitted, 4 received, 0% packet loss, time 3006ms
rtt min/avg/max/mdev = 47.881/55.393/61.984/5.723 ms
SSH Remote Connection
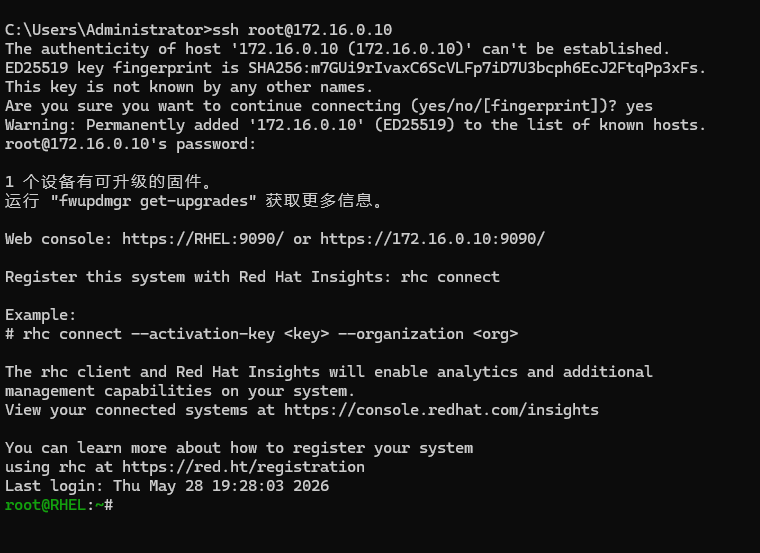
In actual system operations and maintenance, the vast majority of operations are performed via SSH remote management. Return to the host machine, open terminal tools such as MobaXterm or Windterm, or open CMD and remotely connect to this RHEL server using the static IP configured earlier:
ssh root@172.16.0.10
On first connection, the system will display a key fingerprint prompt. This is a normal security verification mechanism. Simply type yes and press Enter, then enter the root password to log into the system.